3D Rendering
One very interesting tools which is always usefull while using robots and other sensors which can interact in real time is to be able to render 3D scenes. As always we first see how we can link our executable to the 3D rendering library.
find_package(vsg)
find_package(vsgXchange)

add_executable(myexecutable main.cpp)
target_compile_definitions(myexecutable PRIVATE vsgXchange_FOUND)
target_compile_definitions(myexecutable PRIVATE CURAN_COPIED_RESOURCE_PATH="${post_build_resource_path}")
target_link_libraries(myexecutable
PUBLIC
vsg::vsg
vsgXchange::vsgXchange
renderable
)
The following lists the classes inside Curan that help you process data in realtime
- Empty Scene(todo) : Empty Scene
- Sphere(todo) : Sphere
- SequencialLinks(todo) : SequencialLinks
- Mesh(todo) : Mesh
- ImGUIInterface(todo) : ImGUIInterface
- DynamicTexture(todo) : DynamicTexture
- DynamicHeight(todo) : DynamicHeight
- Cylinder(todo) : Cylinder
- Capsule(todo) : Capsule
- Volume(todo) : Volume
- Box(todo) : Box
- Arrow(todo) : Arrow
- Add data assyncronously(todo) : Add data assyncronously
Empty Scene
To render a 3D scene we have a couple of requirments in our lab:
- We must have the flexibility do add objects at runtime,
- we must be able to delete objects from a scene
- add objects whilst the program is running
To achieve this goal we developed a custom API for us. Lets take a look at how we can start and create an empty scene. Start by including the necessary header files
#include "rendering/Window.h"
#include <iostream>
Once the necessary header files have been included we can define our main function and declare the structure which is used to create an empty window
int main(int argc, char **argv) {
    curan::renderable::Window::Info info;
    info.api_dump = false;
    info.display = "";
    info.full_screen = false;
    info.is_debug = false;
    info.screen_number = 0;
    info.title = "myviewer";
    curan::renderable::Window::WindowSize size{1000, 800};
    info.window_size = size;
    curan::renderable::Window window{info};
most of these names should be self explanatory, you can request Vulkan to enter in debug mode to output information in case something went wrong with the rendering pipeline we set for ourselfs. You also define the size of the window we want to create. Now that the window is created the Vulkan resources required to render our empty scene will be controlled by this class. Once the destructor of the class is called the resources will be released in the proper sequence. We are ready to render our scene
window.run();
The run method is simple. The requests from the windowing system are processed and appended to the window, our geometries are rendered in loop. This method only returns either when a close event has been triggered or something went seriously wrong in our rendering pipeline, e.g. the swapchain could not return a valid image for us to render into. Once we return we can transverse the objects which are currently rendered on the scene as
    window.transverse_identifiers(
        [](const std::unordered_map<std::string, vsg::ref_ptr<curan::renderable::Renderable>>
            &map) {
        for (auto &p : map)
            std::cout << "Object contained: " << p.first << '\n';
    });
    return 0;
}
Because the scene is empty no output will be produced to the output stream. This source code will create an empty window which we can rotate and move
The wired floor is automatically added to the scene to facilitate the visualization by inexperienced personel viewing our demos (similar to the background of blender).
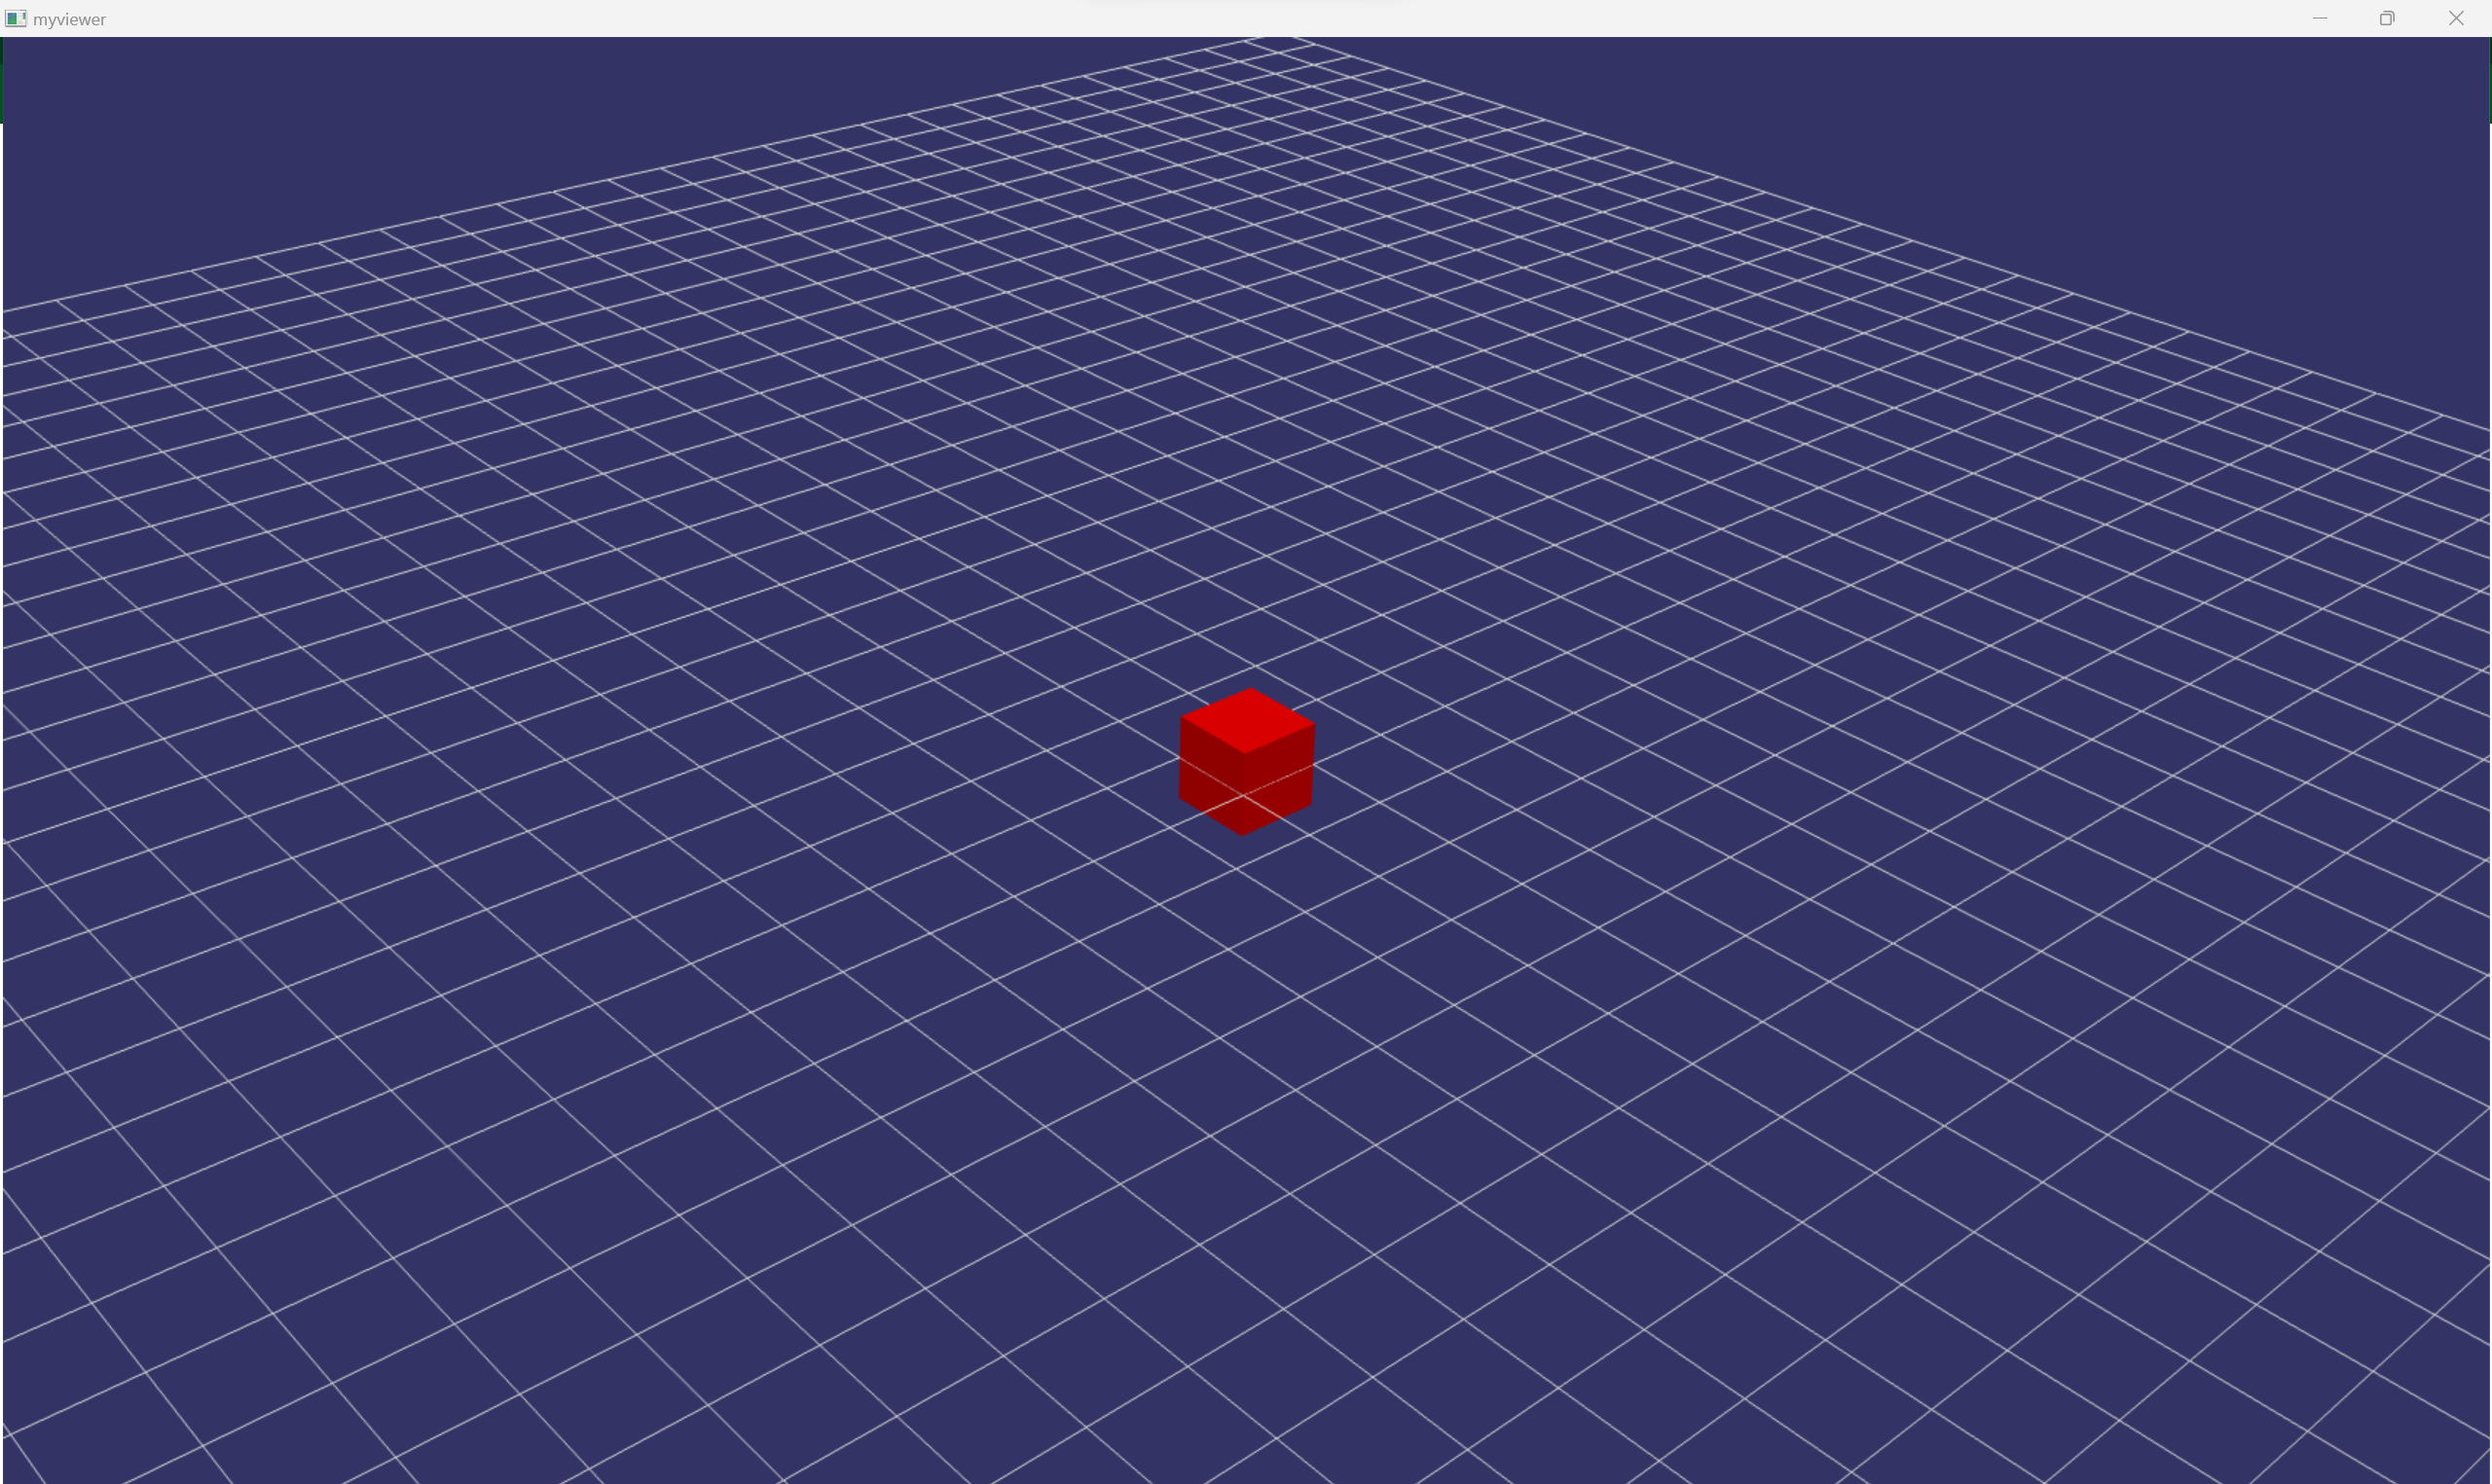
Add asyncronous box
Now imagine that you want to add a red box to the scene once an external signal has been received from a peripheral (think TCP/UDP connection or USB connection). This requires the need for assyncronous additions to the scene graph. We tried to make this procedure as simple as possible. Lets take a look at the function which will be called once this signal is received from the outside world. First we need to include the necessary header files
#include "rendering/Window.h"
#include "rendering/Renderable.h"
#include "rendering/Sphere.h"
#include <iostream>
#include <chrono>
the function which will be called receives a window reference (the window is an object that cannot be coppied). Creates the structure which defines the properties of the sphere whilst the only requirment is to call the “«” operator, e.g. put the Renderable object inside our window
int mimic_waiting_for_connection(curan::renderable::Window& window){
    curan::renderable::Box::Info create_info;
    create_info.geomInfo.dx = vsg::vec3(0.5,0.0,0.0);
    create_info.geomInfo.dy = vsg::vec3(0.0,0.5,0.0);
    create_info.geomInfo.dz = vsg::vec3(0.0,0.0,0.5);
    create_info.geomInfo.position = vsg::vec3(0.0,0.0,0.0);
    create_info.geomInfo.color = vsg::vec4(1.0,0.0,0.0,1.0);
    create_info.builder = vsg::Builder::create();
    vsg::ref_ptr<curan::renderable::Renderable> box = curan::renderable::Box::make(create_info);
    window << box;
};
now we can write the code that sets up our window as before
int main(int argc, char **argv) {
    curan::renderable::Window::Info info;
    info.api_dump = false;
    info.display = "";
    info.full_screen = false;
    info.is_debug = false;
    info.screen_number = 0;
    info.title = "myviewer";
    curan::renderable::Window::WindowSize size{1000, 800};
    info.window_size = size;
    curan::renderable::Window window{info};
now we can define a lambda which we will launch before running our window. Notice that this lambda captures a reference to our window. Once this lambda is called the thread will wait for 10000 miliseconds before calling the function that appends the box. This gives enought time to mimic an external signal
    auto external_signal = [&](){
        std::this_thread::sleep_for(std::chrono::miliseconds(10000));
        mimic_waiting_for_connection(window);
    };
finaly we can launch a thread which will execute our function.
    std::thread connect_thread(external_signal);
    window.run();
    connect_thread.join();
    return 0;
}
The scene after 10 seconds is now
For a reference of objects that you can add to the scene look and the classes available inside the renderer library. There are two special objects which need a bit more attention.
Sphere
SequencialLinks
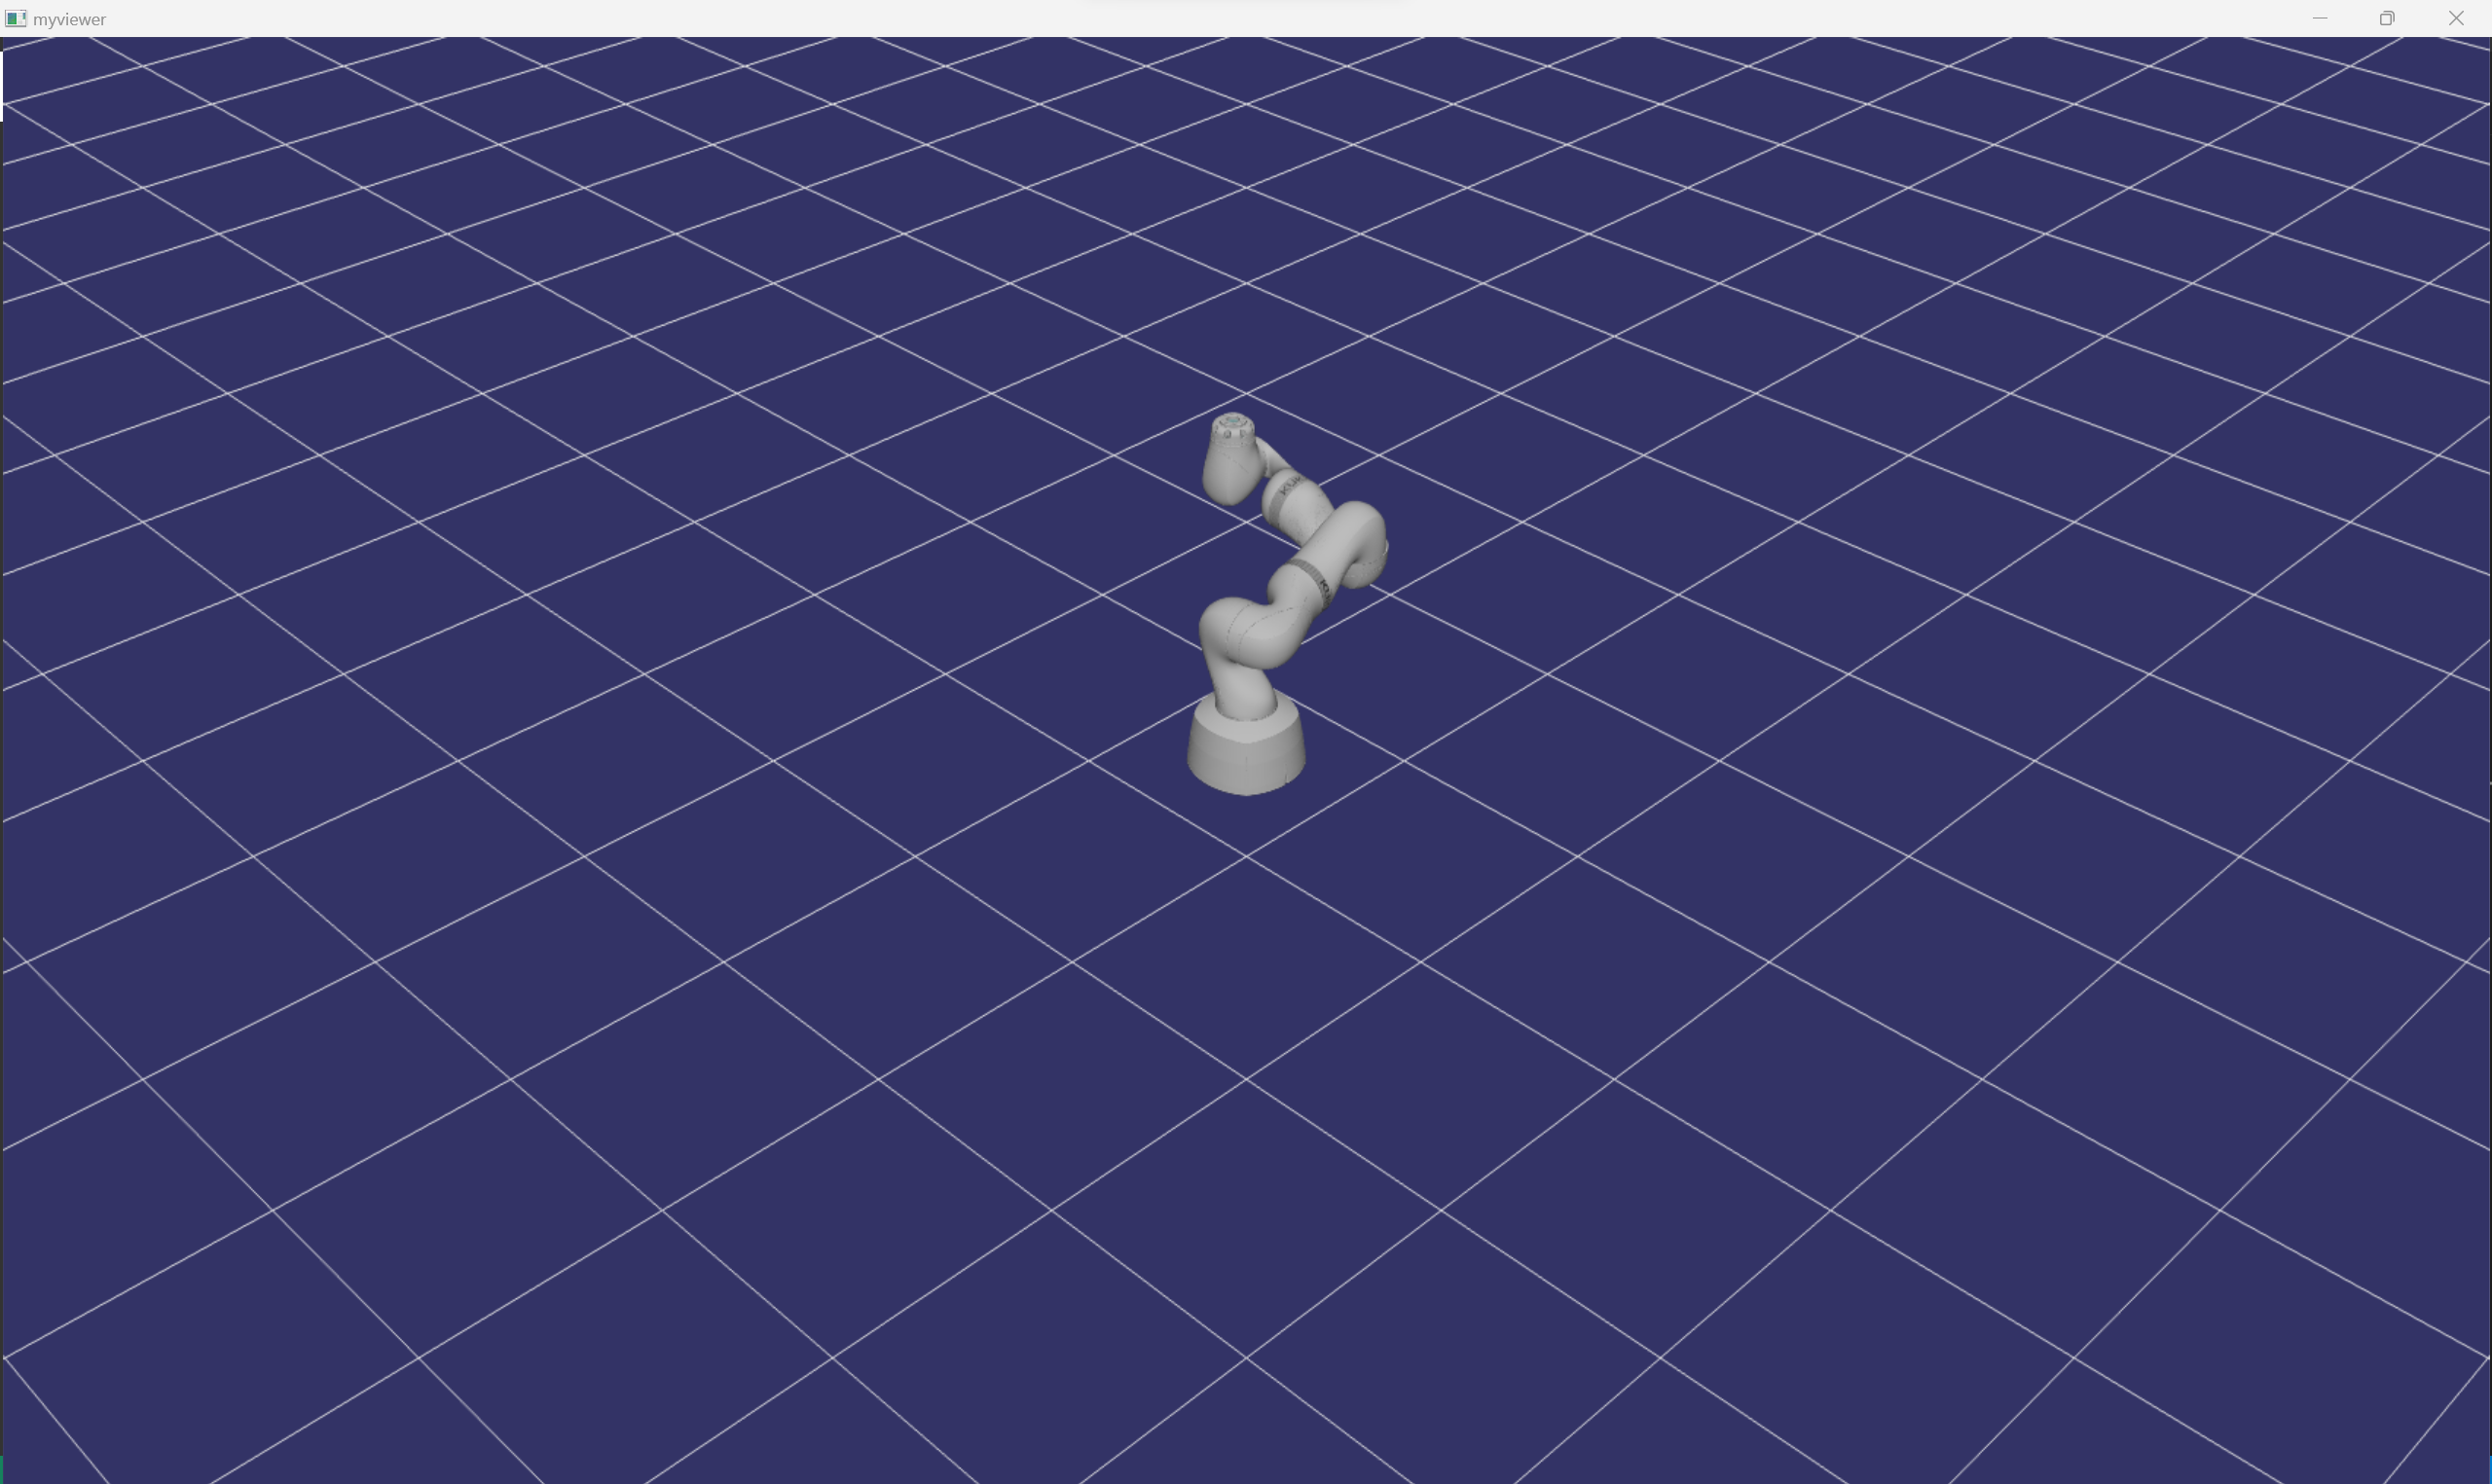
How to create a robot is one of them. So in Curan you can create an object of the type SequencialLinks. Because of its wide addoption we use the Denavit-Harterberg convention. To define a custom robot you must first write the parameters that correspond to the frames of the links of your robot and then move the meshes to the correct relative pose (I would advise using MeshLab for these purpouses). Once you have done this, write a text file in json format. The following snippit of json shows the D-H parameters of the LBR Med. Notice the path string detailing the obj extension
[
    {
        "path": "BaseModified.obj",
        "d_offset" : 0.0,
        "theta" : 0 ,
        "a_offset" : 0,
        "alpha" : 0
    },
    {
        "path": "Link1Modified.obj",
        "d_offset" : 0.34,
        "theta" : 0 ,
        "a_offset" : 0,
        "alpha" : -90
    },
    {
        "path": "Link2Modified.obj",
        "d_offset" : 0.0,
        "theta" : 0 ,
        "a_offset" : 0,
        "alpha" : 90
    },
    {
        "path": "Link3Modified.obj",
        "d_offset" : 0.4,
        "theta" : 0 ,
        "a_offset" : 0,
        "alpha" : 90
    },
    {
        "path": "Link4Modified.obj",
        "d_offset" : 0.0,
        "theta" : 0 ,
        "a_offset" : 0,
        "alpha" : -90
    },
    {
        "path": "Link5Modified.obj",
        "d_offset" : 0.4,
        "theta" : 0 ,
        "a_offset" : 0,
        "alpha" : -90
    },
    {
        "path": "Link6Modified.obj",
        "d_offset" : 0.0,
        "theta" : 0 ,
        "a_offset" : 0,
        "alpha" : 90
    },
    {
        "path": "Link7Modified.obj",
        "d_offset" : 0,
        "theta" : 0 ,
        "a_offset" : 0,
        "alpha" : 0
    }
]
your file structure would look something like this
some directory ---
                 |-> arm.json
                 |-> BaseModified.obj
                 |-> Link1Modified.obj
                 |-> Link2Modified.obj
                 |-> Link3Modified.obj
                 |-> Link4Modified.obj
                 |-> Link5Modified.obj
                 |-> Link6Modified.obj
                 |-> Link7Modified.obj
now in your C++ code you can just launch a function which appends the robot to the window and then moves the robot in real time. Lets take a look at how one can do this. First you need to include the necessary header files
#include "rendering/SequencialLinks.h"
#include "rendering/Window.h"
#include "rendering/Renderable.h"
#include <iostream>
then you can define the function which receives a window and a flag indicating if the window has been closed or not. This function reads the arm.json file which contains the D-H parameters and the relative paths to the mesh files of the robot
void move_robot(curan::renderable::Window& window, std::atomic<bool>& continue_updating){
    std::filesystem::path robot_path = CURAN_COPIED_RESOURCE_PATH"/models/lbrmed/arm.json";
    curan::renderable::SequencialLinks::Info create_info;
    create_info.convetion = vsg::CoordinateConvention::Y_UP;
    create_info.json_path = robot_path;
    create_info.number_of_links = 8;
    vsg::ref_ptr<curan::renderable::Renderable> robotRenderable = curan::renderable::SequencialLinks::make(create_info);
    window << robotRenderable;
now that we have added the robot to the window we can update the angles of the links of the robot as shown in the following snippet of code
    double angle = 0.0;
    double time = 0.0;
    while(continue_updating.load()){
        auto robot = robotRenderable->cast<curan::renderable::SequencialLinks>();
        for(size_t index = 0; index < 7 ; ++index)
            robot->set(index,angle);
        angle = std::sin(time)*1.5;
        std::this_thread::sleep_for(std::chrono::milliseconds(16));
        time += 0.016;
    }
}
now we define our main function, where we initialize our window
int main(int argc, char **argv) {
    curan::renderable::Window::Info info;
    info.api_dump = false;
    info.display = "";
    info.full_screen = false;
    info.is_debug = false;
    info.screen_number = 0;
    info.title = "myviewer";
    curan::renderable::Window::WindowSize size{1000, 800};
    info.window_size = size;
    curan::renderable::Window window{info};
and we can initialize our atomic boolean variable to feed into the move robot function. First we can define a lambda to execute in a parallel thread
    std::atomic<bool> continue_updating = true;
    auto update_robot_pose = [&](){
        move_robot(window,continue_updating);
    };
    std::thread local_thread{update_robot_pose};

    window.run();
    continue_updating.store(false);
    local_thread.join();

    return 0;
}
and finaly this is the result of all of our hard work